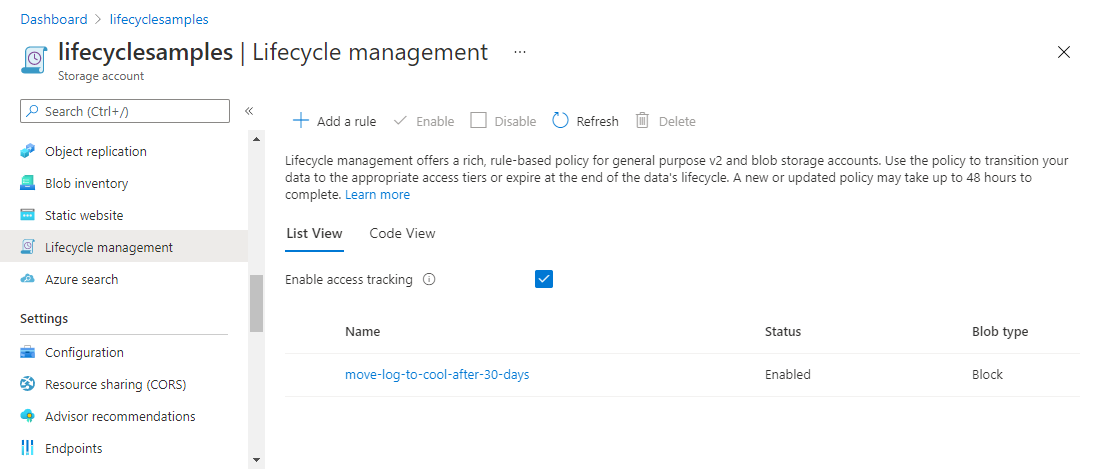
This article shows you how to create or manage an Azure Blob Storage lifecycle management policy.
Use lifecycle management policies to transition blobs to cost-efficient access tiers based on their use patterns or delete them at the end of their lifecycle. To learn more, see Azure Blob Storage lifecycle management overview.
Note
You must read or write a lifecycle management policy in full. The service doesn't support partial updates.
Create or manage a policy
In the Azure portal, go to your storage account.
Under Data management, select Lifecycle management to view or change lifecycle management policies.
Select the List View tab.
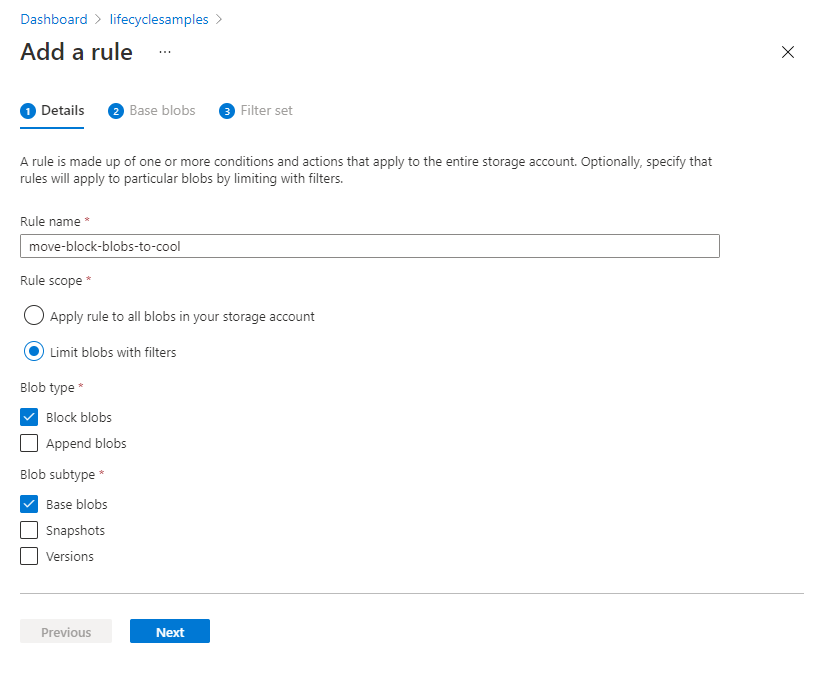
Select Add a rule and name your rule on the Details form. You can also set the Rule scope, Blob type, and Blob subtype values. The following example sets the scope to filter blobs. This step adds the Filter set tab.
Select Base blobs to set the conditions for your rule. In the following example, blobs are moved to the cool tier if they aren't modified for 30 days.
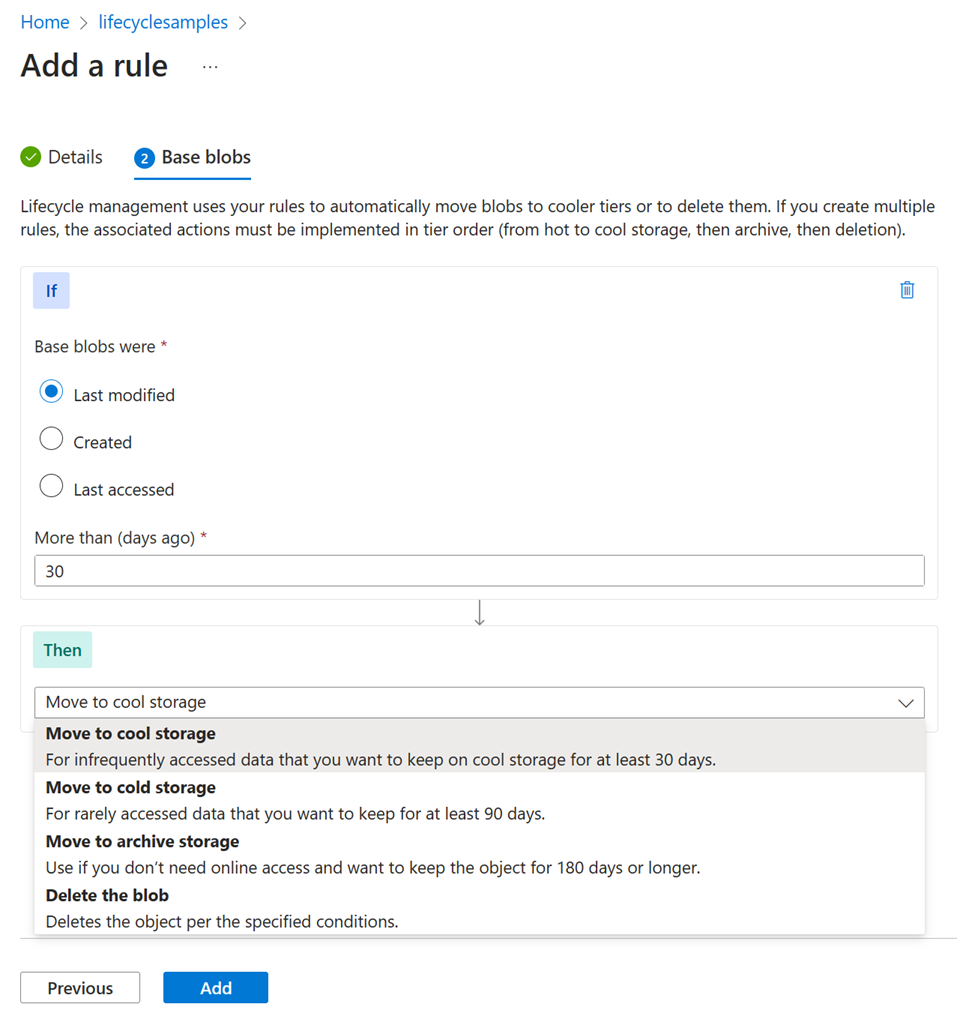
The Last accessed option is available only if you enabled access time tracking and you selected Block blobs as the blob type. See Enable access time tracking.
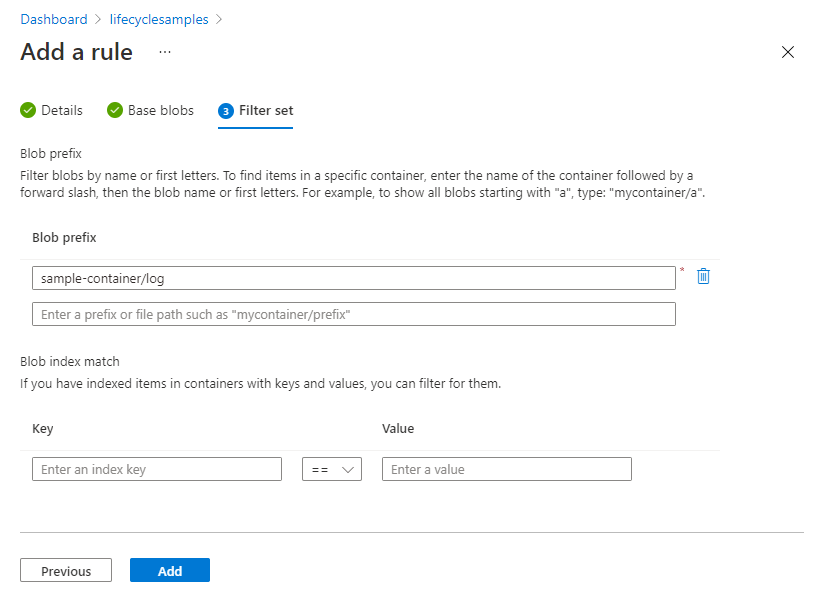
If you selected Limit blobs with filters on the Details page, select Filter set to add an optional filter. The following example filters on blobs whose name begins with log in a container called sample-container.
If you encounter unexpected results, see the following FAQ entry: The blob prefix match string didn't apply the policy to the expected blobs.
Select Add to add the new policy.
The new rule appears in the List View tab. Azure Storage runs the policy once per day.
Manage a policy by using the code view
You can also define a policy by adding JSON code directly in the Code View tab.
The following screenshot shows JSON in the Code View tab. This JSON defines a lifecycle policy that moves a block blob whose name begins with log to the cool tier if it's been more than 30 days since the blob was modified.
To add a lifecycle management policy with PowerShell, use these commands:
The following example shows how to use each of these commands to create a lifecycle policy. Replace the placeholder values in angle brackets with your own values:
# Initialize the following variables with your values.
$rgName = "<resource-group>"
$accountName = "<storage-account>"

# Create a new action object.
$action = Add-AzStorageAccountManagementPolicyAction -BaseBlobAction Delete `
    -daysAfterModificationGreaterThan 180
Add-AzStorageAccountManagementPolicyAction -InputObject $action `
    -BaseBlobAction TierToArchive `
    -daysAfterModificationGreaterThan 90
Add-AzStorageAccountManagementPolicyAction -InputObject $action `
    -BaseBlobAction TierToCool `
    -daysAfterModificationGreaterThan 30
Add-AzStorageAccountManagementPolicyAction -InputObject $action `
    -SnapshotAction Delete `
    -daysAfterCreationGreaterThan 90
Add-AzStorageAccountManagementPolicyAction -InputObject $action `
    -BlobVersionAction TierToArchive `
    -daysAfterCreationGreaterThan 90

# Create a new filter object.
$filter = New-AzStorageAccountManagementPolicyFilter -PrefixMatch ab,cd `
    -BlobType blockBlob

# Create a new rule object.
$rule1 = New-AzStorageAccountManagementPolicyRule -Name sample-rule `
    -Action $action `
    -Filter $filter

# Create the policy.
Set-AzStorageAccountManagementPolicy -ResourceGroupName $rgName `
    -StorageAccountName $accountName `
    -Rule $rule1
To add a lifecycle management policy with Azure CLI, write the policy to a JSON file, then call the az storage account management-policy create command to create the policy.
The following example shows how to use this command to create a lifecycle policy. Replace the placeholder values in angle brackets with your own values:
az storage account management-policy create \
    --account-name <storage-account> \
    --policy @policy.json \
    --resource-group <resource-group>
To define a lifecycle management policy with an Azure Resource Manager template, include the Microsoft.Storage/storageAccounts/managementPolicies object in your template. For configuration details, see Microsoft.Storage/storageAccounts/managementPolicies - Bicep & ARM template reference. The Microsoft.Storage/storageAccounts/managementPolicies object is available in the Azure Storage Resource Provider REST API for versions 2018-11-01 and later.
Enable access time tracking
Enable access time tracking if you want to include an action based on the time that the blob was last accessed with a read or write operation. To learn about the behavior of this capability, see Access time tracking.
Go to your storage account in the Azure portal.
In the Data management section, select Lifecycle management.
Select the Enable access tracking checkbox.
To enable last access time tracking with PowerShell, call the Enable-AzStorageBlobLastAccessTimeTracking command, as shown in the following example. Remember to replace placeholder values in angle brackets with your own values:
# Initialize these variables with your values.
$rgName = "<resource-group>"
$accountName = "<storage-account>"

Enable-AzStorageBlobLastAccessTimeTracking  -ResourceGroupName $rgName `
    -StorageAccountName $accountName `
    -PassThru
To enable last access time tracking with Azure CLI, call the az storage account blob-service-properties update command, as shown in the following example. Remember to replace placeholder values in angle brackets with your own values:
az storage account blob-service-properties update \
    --resource-group <resource-group> \
    --account-name <storage-account> \
    --enable-last-access-tracking true
See also