Note
Access to this page requires authorization. You can try signing in or changing directories.
Access to this page requires authorization. You can try changing directories.
The objective of this article is to show you the steps you need to perform in Jive and Microsoft Entra ID to automatically provision and de-provision user accounts from Microsoft Entra ID to Jive.
Prerequisites
The scenario outlined in this article assumes that you already have the following items:
- A Microsoft Entra tenant.
- A Jive single-sign on enabled subscription.
- A user account in Jive with Team Admin permissions.
Assigning users to Jive
Microsoft Entra ID uses a concept called "assignments" to determine which users should receive access to selected apps. In the context of automatic user account provisioning, only the users and groups that have been "assigned" to an application in Microsoft Entra ID is synchronized.
Before configuring and enabling the provisioning service, you need to decide what users and/or groups in Microsoft Entra ID represent the users who need access to your Jive app. Once decided, you can assign these users to your Jive app by following the instructions here:
Assign a user or group to an enterprise app
Important tips for assigning users to Jive
It's recommended that a single Microsoft Entra user be assigned to Jive to test the provisioning configuration. Additional users and/or groups may be assigned later.
When assigning a user to Jive, you must select a valid user role. The "Default Access" role doesn't work for provisioning.
Enable User Provisioning
This section guides you through connecting your Microsoft Entra ID to Jive's user account provisioning API, and configuring the provisioning service to create, update, and disable assigned user accounts in Jive based on user and group assignment in Microsoft Entra ID.
Tip
You may also choose to enable SAML-based single sign-on for Jive, following the instructions provided in the Azure portal. Single sign-on can be configured independently of automatic provisioning, though these two features complement each other.
To configure user account provisioning:
The objective of this section is to outline how to enable user provisioning of Active Directory user accounts to Jive. As part of this procedure, you're required to provide a user security token you need to request from Jive.com.
Sign in to the Microsoft Entra admin center as at least a Cloud Application Administrator.
Browse to Entra ID > Enterprise apps.
If you have already configured Jive for single sign-on, search for your instance of Jive using the search field. Otherwise, select Add and search for Jive in the application gallery. Select Jive from the search results, and add it to your list of applications.
Select your instance of Jive, then select the Provisioning tab.
Select + New configuration.

In the Tenant URL field, enter your Jive Tenant URL and Secret Token. Select Test Connection to ensure Microsoft Entra ID can connect to Jive. If the connection fails, ensure your Jive account has the required admin permissions and try again.

Select Create to create your configuration.
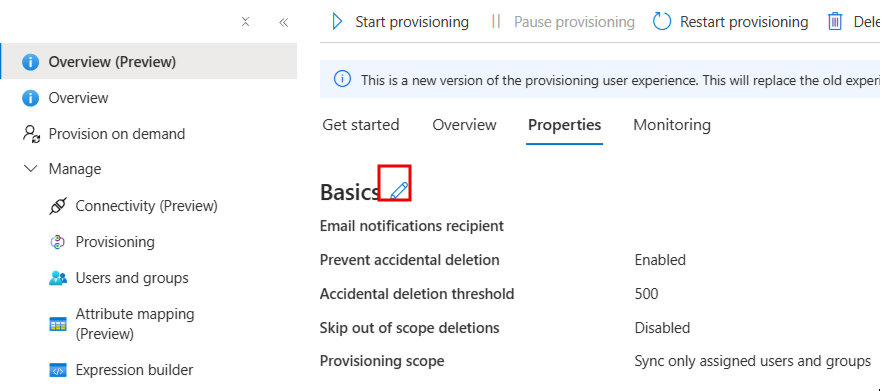
Select Properties on the Overview page.
Select the Edit icon to edit the properties. Enable notification emails and provide an email to receive quarantine notifications. Enable Accidental deletions prevention. Select Apply to save the changes.
In the Notification Email field, enter the email address of a person who should receive the provisioning error notifications and select the Send an email notification when a failure occurs check box.
Select Attribute Mapping in the left panel and select users.
In the Attribute Mappings section, review the user attributes that are synchronized from Microsoft Entra ID to Jive. The attributes selected as Matching properties are used to match the user accounts in Jive for update operations. Select the Save button to commit any changes.
To configure scoping filters, refer to the instructions provided in the Scoping filter article.
Use on-demand provisioning to validate sync with a small number of users before deploying more broadly in your organization.
When you're ready to provision, select Start Provisioning from the Overview page.
For more information on how to read the Microsoft Entra provisioning logs, see Reporting on automatic user account provisioning.